[fusion_builder_container hundred_percent="no" equal_height_columns="no" menu_anchor="" hide_on_mobile="small-visibility,medium-visibility,large-visibility" class="" id="" background_color="" background_image="" background_position="center center" background_repeat="no-repeat" fade="no" background_parallax="none" parallax_speed="0.3" video_mp4="" video_webm="" video_ogv="" video_url="" video_aspect_ratio="16:9" video_loop="yes" video_mute="yes" overlay_color="" video_preview_image="" border_size="" border_color="" border_style="solid" padding_top="" padding_bottom="" padding_left="" padding_right=""][fusion_builder_row][fusion_builder_column type="1_1" layout="1_1" background_position="left top" background_color="" border_size="" border_color="" border_style="solid" border_position="all" spacing="yes" background_image="" background_repeat="no-repeat" padding_top="" padding_right="" padding_bottom="" padding_left="" margin_top="0px" margin_bottom="0px" class="" id="" animation_type="" animation_speed="0.3" animation_direction="left" hide_on_mobile="small-visibility,medium-visibility,large-visibility" center_content="no" last="no" min_height="" hover_type="none" link=""][fusion_text columns="" column_min_width="" column_spacing="" rule_style="default" rule_size="" rule_color="" hide_on_mobile="small-visibility,medium-visibility,large-visibility" class="" id="" animation_type="" animation_direction="left" animation_speed="0.3" animation_offset=""]
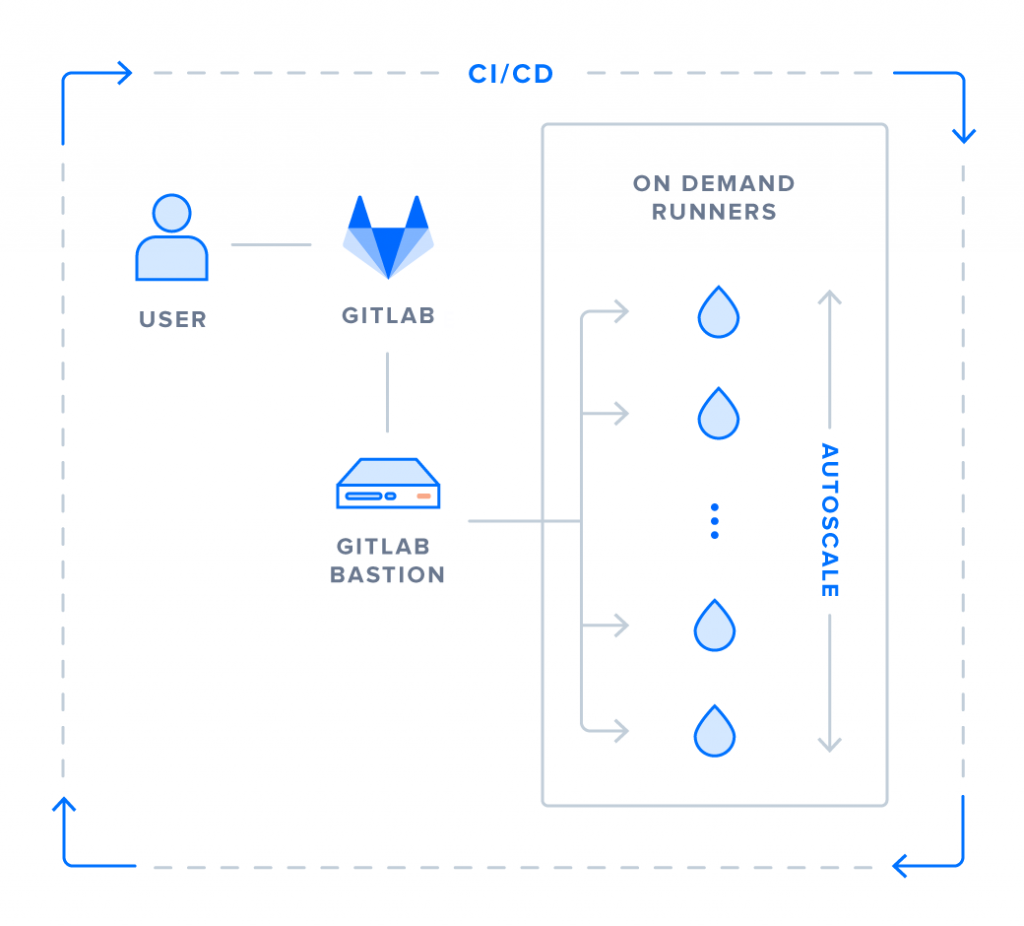
Et si on profitait de cette période de confinement pour faire un peu d’optimisation de nos services. C’est pourquoi, je vous propose un petit tutoriel sur la mise en place d'un "bastion gitlab". L'objectif est d’appliquer la technologie d’autoscaling pour nos gitlab-runners à fin de toujours en avoir à disposition et de ne payer que ce que l'on consomme. Vive le "pay-as-you-go" !

Dans l'exemple ci-dessous j'aborderais le bastion gitlab avec le provider digitalocean, je ferais certainement un test avec un autre providers comme OVH et ceci fera l’objet d’un autre article.
[/fusion_text][fusion_title title_type="text" rotation_effect="bounceIn" display_time="1200" highlight_effect="circle" loop_animation="off" highlight_width="9" highlight_top_margin="0" before_text="" rotation_text="" highlight_text="" after_text="" hide_on_mobile="small-visibility,medium-visibility,large-visibility" class="" id="" content_align="left" size="1" font_size="" animated_font_size="" fusion_font_family_title_font="" fusion_font_subset_title_font="" fusion_font_variant_title_font="" line_height="" letter_spacing="" margin_top="" margin_bottom="" margin_top_mobile="" margin_bottom_mobile="" text_color="" animated_text_color="" highlight_color="" style_type="default" sep_color="" animation_type="" animation_direction="left" animation_speed="0.3" animation_offset=""]
Étape 1 : Préparer l’infrastructure
[/fusion_title][fusion_text columns="" column_min_width="" column_spacing="" rule_style="default" rule_size="" rule_color="" hide_on_mobile="small-visibility,medium-visibility,large-visibility" class="" id="" animation_type="" animation_direction="left" animation_speed="0.3" animation_offset=""]
Pour commencer nous allons définir l'infrastructure qu'il nous faut, c’est pourquoi nous allons utiliser le système de droplet dont plusieurs types de machine existe. Certaines sont spécialisé dans la puissance CPU, d’autre en RAM, tout va dépendre de notre besoin de performance. Dans notre cas notre bastion peut être sur un droplet peu couteux puisqu’il ne sert qu’à démarrer un droplet lorsque celui-ci va détecter le démarrage d’un pipeline.
Nous aurons besoin d’un autre produit de digitalocean, c’est Space. Space est un système d’object storage et va nous permettre de persister le cache, les artifacts... Pour faire simple, même après la suppression des droplets exécutant les jobs, nous serons encore en mesure d’accéder aux résultats configurés dans gitlab-ci (bien entendu sans compter la durée de rétention que vous auriez paramétré, par défaut elle est de 30 jours)
Ensuite nous créerons un private Network afin de sécuriser la connexion entre notre bastion et les gitlab runners lors de l'exécution des pipelines et réduire la configuration du firewall au passage.
[/fusion_text][fusion_title title_type="text" rotation_effect="bounceIn" display_time="1200" highlight_effect="circle" loop_animation="off" highlight_width="9" highlight_top_margin="0" before_text="" rotation_text="" highlight_text="" after_text="" hide_on_mobile="small-visibility,medium-visibility,large-visibility" class="" id="" content_align="left" size="1" font_size="" animated_font_size="" fusion_font_family_title_font="" fusion_font_subset_title_font="" fusion_font_variant_title_font="" line_height="" letter_spacing="" margin_top="" margin_bottom="" margin_top_mobile="" margin_bottom_mobile="" text_color="" animated_text_color="" highlight_color="" style_type="default" sep_color="" animation_type="" animation_direction="left" animation_speed="0.3" animation_offset=""]
Étape 2 : Configuration du gitlab-runner
[/fusion_title][fusion_text columns="" column_min_width="" column_spacing="" rule_style="default" rule_size="" rule_color="" hide_on_mobile="small-visibility,medium-visibility,large-visibility" class="" id="" animation_type="" animation_direction="left" animation_speed="0.3" animation_offset=""]
Comme mentionné à l’étape précédente, nous allons générer un droplet de petite taille et nous allons nous connecter en SSH pour appliquer les règles de sécurité habituelle à tout nouveau serveur puis, ajouter le repository officiel de gitlab runner.
[/fusion_text][fusion_syntax_highlighter theme="" language="x-sh" line_numbers="" line_wrapping="" copy_to_clipboard="" copy_to_clipboard_text="" hide_on_mobile="small-visibility,medium-visibility,large-visibility" class="" id="" font_size="" border_size="" border_color="" border_style="" background_color="" line_number_background_color="" line_number_text_color="" margin_top="" margin_right="" margin_bottom="" margin_left=""]Y2QgL3RtcApjdXJsIC1MIGh0dHBzOi8vcGFja2FnZXMuZ2l0bGFiLmNvbS9pbnN0YWxsL3JlcG9zaXRvcmllcy9ydW5uZXIvZ2l0bGFiLXJ1bm5lci9zY3JpcHQuZGViLnNoIHwgc3VkbyBiYXNo[/fusion_syntax_highlighter][fusion_text columns="" column_min_width="" column_spacing="" rule_style="default" rule_size="" rule_color="" hide_on_mobile="small-visibility,medium-visibility,large-visibility" class="" id="" animation_type="" animation_direction="left" animation_speed="0.3" animation_offset=""]
Une foi ajouté, nous allons procéder à l’installation.
[/fusion_text][fusion_syntax_highlighter theme="" language="x-sh" line_numbers="" line_wrapping="" copy_to_clipboard="" copy_to_clipboard_text="" hide_on_mobile="small-visibility,medium-visibility,large-visibility" class="" id="" font_size="" border_size="" border_color="" border_style="" background_color="" line_number_background_color="" line_number_text_color="" margin_top="" margin_right="" margin_bottom="" margin_left=""]c3VkbyBhcHQtZ2V0IGluc3RhbGwgZ2l0bGFiLXJ1bm5lcg==[/fusion_syntax_highlighter][fusion_text columns="" column_min_width="" column_spacing="" rule_style="default" rule_size="" rule_color="" hide_on_mobile="small-visibility,medium-visibility,large-visibility" class="" id="" animation_type="" animation_direction="left" animation_speed="0.3" animation_offset=""]
Ne surtout pas oublier d’installer Docker Machine puisque que notre système repose sur cet outil complémentaire à docker pour automatiser la création de conteneur. Hésitez pas à relire notre article sur Docker Machine.
[/fusion_text][fusion_syntax_highlighter theme="" language="x-sh" line_numbers="" line_wrapping="" copy_to_clipboard="" copy_to_clipboard_text="" hide_on_mobile="small-visibility,medium-visibility,large-visibility" class="" id="" font_size="" border_size="" border_color="" border_style="" background_color="" line_number_background_color="" line_number_text_color="" margin_top="" margin_right="" margin_bottom="" margin_left=""]Y3VybCAtTCBodHRwczovL2dpdGh1Yi5jb20vZG9ja2VyL21hY2hpbmUvcmVsZWFzZXMvZG93bmxvYWQvdjAuMTQuMC9kb2NrZXItbWFjaGluZS1gdW5hbWUgLXNgLWB1bmFtZSAtbWAgPi90bXAvZG9ja2VyLW1hY2hpbmUgJiYgXApzdWRvIGluc3RhbGwgL3RtcC9kb2NrZXItbWFjaGluZSAvdXNyL2xvY2FsL2Jpbi9kb2NrZXItbWFjaGluZQ==[/fusion_syntax_highlighter][fusion_text columns="" column_min_width="" column_spacing="" rule_style="default" rule_size="" rule_color="" hide_on_mobile="small-visibility,medium-visibility,large-visibility" class="" id="" animation_type="" animation_direction="left" animation_speed="0.3" animation_offset=""]
En effet, notre processus est plutôt simple, nous allons nous servir de docker-machine comme exécuteur pour le runner gitlab. Ceci va nous permettre de générer des droplets compatible docker pour bénéficier du temps de mise en route des droplets relativement faible et pouvoir exécuter n’importe quelles taches tant que la configuration du fichier d’intégration continue soit réalisé correctement.
Une fois ces installations terminées, nous pouvons passer à la connexion de notre GitLab Runner à notre installation GitLab.
[/fusion_text][fusion_title title_type="text" rotation_effect="bounceIn" display_time="1200" highlight_effect="circle" loop_animation="off" highlight_width="9" highlight_top_margin="0" before_text="" rotation_text="" highlight_text="" after_text="" hide_on_mobile="small-visibility,medium-visibility,large-visibility" class="" id="" content_align="left" size="1" font_size="" animated_font_size="" fusion_font_family_title_font="" fusion_font_subset_title_font="" fusion_font_variant_title_font="" line_height="" letter_spacing="" margin_top="" margin_bottom="" margin_top_mobile="" margin_bottom_mobile="" text_color="" animated_text_color="" highlight_color="" style_type="default" sep_color="" animation_type="" animation_direction="left" animation_speed="0.3" animation_offset=""]
Étape 3 : Obtenir un token gitlab
[/fusion_title][fusion_text columns="" column_min_width="" column_spacing="" rule_style="default" rule_size="" rule_color="" hide_on_mobile="small-visibility,medium-visibility,large-visibility" class="" id="" animation_type="" animation_direction="left" animation_speed="0.3" animation_offset=""]
Nous devons utiliser un Token, pour relier notre runner précédemment installé avec la plateforme gitlab que vous désirez. Nous avons pour cela deux méthodes :
- Si vous êtes administrateur de la plateforme, vous pouvez vous rendre dans les paramètres généraux de gitlab, section Runner et ainsi trouver l’adresse de connexion et le token associé.
- Vous n'êtes pas administrateur de la plateforme mais vous possédez des projets alors vous pouvez quand même y avoir accès. Rendez-vous sur le projet dans lequel vous souhaitez mettre en place un pipeline. Dans les paramètres du projet, section CI/CD, vous devriez avoir une partie concernant les Runners, puis Specific runner, dans laquelle nous trouvons l’adresse de connexion et le token associé.
[/fusion_text][fusion_title title_type="text" rotation_effect="bounceIn" display_time="1200" highlight_effect="circle" loop_animation="off" highlight_width="9" highlight_top_margin="0" before_text="" rotation_text="" highlight_text="" after_text="" hide_on_mobile="small-visibility,medium-visibility,large-visibility" class="" id="" content_align="left" size="1" font_size="" animated_font_size="" fusion_font_family_title_font="" fusion_font_subset_title_font="" fusion_font_variant_title_font="" line_height="" letter_spacing="" margin_top="" margin_bottom="" margin_top_mobile="" margin_bottom_mobile="" text_color="" animated_text_color="" highlight_color="" style_type="default" sep_color="" animation_type="" animation_direction="left" animation_speed="0.3" animation_offset=""]
Étape 4 : Initialisation du Runner sur le Bastion
[/fusion_title][fusion_text columns="" column_min_width="" column_spacing="" rule_style="default" rule_size="" rule_color="" hide_on_mobile="small-visibility,medium-visibility,large-visibility" class="" id="" animation_type="" animation_direction="left" animation_speed="0.3" animation_offset=""]
Nous allons initialiser le runner sur le bastion.
[/fusion_text][fusion_syntax_highlighter theme="" language="yaml" line_numbers="" line_wrapping="" copy_to_clipboard="" copy_to_clipboard_text="" hide_on_mobile="small-visibility,medium-visibility,large-visibility" class="" id="" font_size="" border_size="" border_color="" border_style="" background_color="" line_number_background_color="" line_number_text_color="" margin_top="" margin_right="" margin_bottom="" margin_left=""]c3Vkb8KgZ2l0bGFiLXJ1bm5lcsKgcmVnaXN0ZXI=[/fusion_syntax_highlighter][fusion_text columns="" column_min_width="" column_spacing="" rule_style="default" rule_size="" rule_color="" hide_on_mobile="small-visibility,medium-visibility,large-visibility" class="" id="" animation_type="" animation_direction="left" animation_speed="0.3" animation_offset=""]
Comme toute installation de runner nous avons une suite de question a fin de saisir des paramètres, tout d’abord, l’URL de votre instance Gitlab.
[/fusion_text][fusion_syntax_highlighter theme="" language="yaml" line_numbers="" line_wrapping="" copy_to_clipboard="" copy_to_clipboard_text="" hide_on_mobile="small-visibility,medium-visibility,large-visibility" class="" id="" font_size="" border_size="" border_color="" border_style="" background_color="" line_number_background_color="" line_number_text_color="" margin_top="" margin_right="" margin_bottom="" margin_left=""]UGxlYXNlwqBlbnRlcsKgdGhlwqBnaXRsYWItY2nCoGNvb3JkaW5hdG9ywqBVUkzCoChlLmcuwqBodHRwczovL2dpdGxhYi5jb20pOgpodHRwczovL2V4YW1wbGUuZGlnaXRhbG9jZWFuLmNvbQ==[/fusion_syntax_highlighter][fusion_text columns="" column_min_width="" column_spacing="" rule_style="default" rule_size="" rule_color="" hide_on_mobile="small-visibility,medium-visibility,large-visibility" class="" id="" animation_type="" animation_direction="left" animation_speed="0.3" animation_offset=""]
Le token que vous avez précédemment récupérer.
[/fusion_text][fusion_syntax_highlighter theme="" language="yaml" line_numbers="" line_wrapping="" copy_to_clipboard="" copy_to_clipboard_text="" hide_on_mobile="small-visibility,medium-visibility,large-visibility" class="" id="" font_size="" border_size="" border_color="" border_style="" background_color="" line_number_background_color="" line_number_text_color="" margin_top="" margin_right="" margin_bottom="" margin_left=""]UGxlYXNlwqBlbnRlcsKgdGhlwqBnaXRsYWItY2nCoHRva2VuwqBmb3LCoHRoaXPCoHJ1bm5lcjoKc2FtcGxlLWdpdGxhYi1jaS10b2tlbg==[/fusion_syntax_highlighter][fusion_text columns="" column_min_width="" column_spacing="" rule_style="default" rule_size="" rule_color="" hide_on_mobile="small-visibility,medium-visibility,large-visibility" class="" id="" animation_type="" animation_direction="left" animation_speed="0.3" animation_offset=""]
Une description pour définir votre runner, essayer d’être le plus explicite.
[/fusion_text][fusion_syntax_highlighter theme="" language="yaml" line_numbers="" line_wrapping="" copy_to_clipboard="" copy_to_clipboard_text="" hide_on_mobile="small-visibility,medium-visibility,large-visibility" class="" id="" font_size="" border_size="" border_color="" border_style="" background_color="" line_number_background_color="" line_number_text_color="" margin_top="" margin_right="" margin_bottom="" margin_left=""]UGxlYXNlwqBlbnRlcsKgdGhlwqBnaXRsYWItY2nCoGRlc2NyaXB0aW9uwqBmb3LCoHRoaXPCoHJ1bm5lcjoKW3lvdXJob3N0bmFtZV3CoHJ1bm5lci1iYXN0aW9u[/fusion_syntax_highlighter][fusion_text columns="" column_min_width="" column_spacing="" rule_style="default" rule_size="" rule_color="" hide_on_mobile="small-visibility,medium-visibility,large-visibility" class="" id="" animation_type="" animation_direction="left" animation_speed="0.3" animation_offset=""]
Vous pouvez saisir des tags pour spécifier votre runner dans votre code .gitlab-ci.yml. Toutefois, nous vous recommandons de ne rien indiquer à ce stade. Vous pourrez facilement le modifier ultérieurement à partir de l'interface GitLab.
[/fusion_text][fusion_syntax_highlighter theme="" language="yaml" line_numbers="" line_wrapping="" copy_to_clipboard="" copy_to_clipboard_text="" hide_on_mobile="small-visibility,medium-visibility,large-visibility" class="" id="" font_size="" border_size="" border_color="" border_style="" background_color="" line_number_background_color="" line_number_text_color="" margin_top="" margin_right="" margin_bottom="" margin_left=""]UGxlYXNlwqBlbnRlcsKgdGhlwqBnaXRsYWItY2nCoHRhZ3PCoGZvcsKgdGhpc8KgcnVubmVywqAoY29tbWHCoHNlcGFyYXRlZCk6CmNvZGUtdGFn[/fusion_syntax_highlighter][fusion_text columns="" column_min_width="" column_spacing="" rule_style="default" rule_size="" rule_color="" hide_on_mobile="small-visibility,medium-visibility,large-visibility" class="" id="" animation_type="" animation_direction="left" animation_speed="0.3" animation_offset=""]
Désormais nous allons pouvoir sélectionner l'exécuteur du runner, dans notre cas “docker+machine”
[/fusion_text][fusion_syntax_highlighter theme="" language="yaml" line_numbers="" line_wrapping="" copy_to_clipboard="" copy_to_clipboard_text="" hide_on_mobile="small-visibility,medium-visibility,large-visibility" class="" id="" font_size="" border_size="" border_color="" border_style="" background_color="" line_number_background_color="" line_number_text_color="" margin_top="" margin_right="" margin_bottom="" margin_left=""]UGxlYXNlwqBlbnRlcsKgdGhlwqBleGVjdXRvcjrCoHNzaCzCoGRvY2tlcittYWNoaW5lLMKgZG9ja2VyLXNzaCttYWNoaW5lLMKga3ViZXJuZXRlcyzCoGRvY2tlcizCoHBhcmFsbGVscyzCoHZpcnR1YWxib3gswqBkb2NrZXItc3NoLMKgc2hlbGw6CmRvY2tlcittYWNoaW5l[/fusion_syntax_highlighter][fusion_text columns="" column_min_width="" column_spacing="" rule_style="default" rule_size="" rule_color="" hide_on_mobile="small-visibility,medium-visibility,large-visibility" class="" id="" animation_type="" animation_direction="left" animation_speed="0.3" animation_offset=""]
Saisissez une image docker à utiliser par défaut, je vous recommande une image alpine pour qu’elle soit légère et rapide à charger
[/fusion_text][fusion_syntax_highlighter theme="" language="yaml" line_numbers="" line_wrapping="" copy_to_clipboard="" copy_to_clipboard_text="" hide_on_mobile="small-visibility,medium-visibility,large-visibility" class="" id="" font_size="" border_size="" border_color="" border_style="" background_color="" line_number_background_color="" line_number_text_color="" margin_top="" margin_right="" margin_bottom="" margin_left=""]UGxlYXNlwqBlbnRlcsKgdGhlwqBEb2NrZXLCoGltYWdlwqAoZS5nLsKgcnVieToyLjEpOgphbHBpbmU6bGF0ZXN0[/fusion_syntax_highlighter][fusion_text columns="" column_min_width="" column_spacing="" rule_style="default" rule_size="" rule_color="" hide_on_mobile="small-visibility,medium-visibility,large-visibility" class="" id="" animation_type="" animation_direction="left" animation_speed="0.3" animation_offset=""]
Normalement, vous avez fini de l’initialiser, pour vérifier il vous suffit d’aller dans les paramètres de votre projet ou configuration générale de gitlab pour voir apparaître l’état de votre bastion.
Si vous souhaitez en savoir plus sur la configuration d’un runner je vous recommande la documentation du GitLab Runner qui est très bien faites.
[/fusion_text][fusion_title title_type="text" rotation_effect="bounceIn" display_time="1200" highlight_effect="circle" loop_animation="off" highlight_width="9" highlight_top_margin="0" before_text="" rotation_text="" highlight_text="" after_text="" hide_on_mobile="small-visibility,medium-visibility,large-visibility" class="" id="" content_align="left" size="1" font_size="" animated_font_size="" fusion_font_family_title_font="" fusion_font_subset_title_font="" fusion_font_variant_title_font="" line_height="" letter_spacing="" margin_top="" margin_bottom="" margin_top_mobile="" margin_bottom_mobile="" text_color="" animated_text_color="" highlight_color="" style_type="default" sep_color="" animation_type="" animation_direction="left" animation_speed="0.3" animation_offset=""]
Étape 5 : Configuration du Cache Docker et Docker Machine
[/fusion_title][fusion_text columns="" column_min_width="" column_spacing="" rule_style="default" rule_size="" rule_color="" hide_on_mobile="small-visibility,medium-visibility,large-visibility" class="" id="" animation_type="" animation_direction="left" animation_speed="0.3" animation_offset=""]
Pour accélérer la création des Droplets lorsque la file d'attente de construction est occupée, nous utiliserons les outils de mise en cache de Docker sur le Droplet pour stocker les images de vos conteneurs les plus utilisés sur DigitalOcean Spaces.
Pour ce faire, mettez à jour Docker Machine sur votre shell SSH en utilisant la commande suivante :
[/fusion_text][fusion_syntax_highlighter theme="" language="x-sh" line_numbers="" line_wrapping="" copy_to_clipboard="" copy_to_clipboard_text="" hide_on_mobile="small-visibility,medium-visibility,large-visibility" class="" id="" font_size="" border_size="" border_color="" border_style="" background_color="" line_number_background_color="" line_number_text_color="" margin_top="" margin_right="" margin_bottom="" margin_left=""]Y3VybMKgLUzCoGh0dHBzOi8vZ2l0aHViLmNvbS9kb2NrZXIvbWFjaGluZS9yZWxlYXNlcy9kb3dubG9hZC92MC4xNC4wL2RvY2tlci1tYWNoaW5lLWB1bmFtZcKgLXNgLWB1bmFtZcKgLW1gwqA+L3RtcC9kb2NrZXItbWFjaGluZcKgJibCoHN1ZG/CoGluc3RhbGzCoC90bXAvZG9ja2VyLW1hY2hpbmXCoC91c3IvbG9jYWwvYmluL2RvY2tlci1tYWNoaW5l[/fusion_syntax_highlighter][fusion_text columns="" column_min_width="" column_spacing="" rule_style="default" rule_size="" rule_color="" hide_on_mobile="small-visibility,medium-visibility,large-visibility" class="" id="" animation_type="" animation_direction="left" animation_speed="0.3" animation_offset=""]
Avec la mise à jour de Docker Machine, nous pouvons passer à la mise en place de notre token pour l'utilisation du GitLab Runner.
Avec le lien suivant vous pourrez configurer les paramètres de votre gitlab Runner En fonction du provider choisi. https://docs.docker.com/machine/drivers/digital-ocean/
[/fusion_text][fusion_title title_type="text" rotation_effect="bounceIn" display_time="1200" highlight_effect="circle" loop_animation="off" highlight_width="9" highlight_top_margin="0" before_text="" rotation_text="" highlight_text="" after_text="" hide_on_mobile="small-visibility,medium-visibility,large-visibility" class="" id="" content_align="left" size="1" font_size="" animated_font_size="" fusion_font_family_title_font="" fusion_font_subset_title_font="" fusion_font_variant_title_font="" line_height="" letter_spacing="" margin_top="" margin_bottom="" margin_top_mobile="" margin_bottom_mobile="" text_color="" animated_text_color="" highlight_color="" style_type="default" sep_color="" animation_type="" animation_direction="left" animation_speed="0.3" animation_offset=""]
Étape 6 : Génération d’un token sur DigitalOcean
[/fusion_title][fusion_text columns="" column_min_width="" column_spacing="" rule_style="default" rule_size="" rule_color="" hide_on_mobile="small-visibility,medium-visibility,large-visibility" class="" id="" animation_type="" animation_direction="left" animation_speed="0.3" animation_offset=""]
Avec votre compte DigitalOcean, vous allez créer les identifiants que le Runner Gitlab va pouvoir utiliser pour créer de nouveau droplet. Dans votre interface DigitalOcean, cliquez sur API, puis recherchez-les "access token" et cliquez sur générer un nouveau token.
Donnez au nouveau token un nom que vous reconnaîtrez, tel que “GitLab Runner Access”, et assurez-vous que les droits de lecture et d'écriture sont activées, car nous en avons besoin pour créer de nouvelles machines sans intervention humaine.
Copiez le token dans un endroit sûr car nous l'utiliserons dans la prochaine étape. Vous ne pouvez pas récupérer ce token sans le régénérer, alors assurez-vous qu'il soit stocké dans un endroit sûr.
[/fusion_text][fusion_title title_type="text" rotation_effect="bounceIn" display_time="1200" highlight_effect="circle" loop_animation="off" highlight_width="9" highlight_top_margin="0" before_text="" rotation_text="" highlight_text="" after_text="" hide_on_mobile="small-visibility,medium-visibility,large-visibility" class="" id="" content_align="left" size="1" font_size="" animated_font_size="" fusion_font_family_title_font="" fusion_font_subset_title_font="" fusion_font_variant_title_font="" line_height="" letter_spacing="" margin_top="" margin_bottom="" margin_top_mobile="" margin_bottom_mobile="" text_color="" animated_text_color="" highlight_color="" style_type="default" sep_color="" animation_type="" animation_direction="left" animation_speed="0.3" animation_offset=""]
Étape 7 : Édition du fichier de configuration du runner gitlab
[/fusion_title][fusion_text columns="" column_min_width="" column_spacing="" rule_style="default" rule_size="" rule_color="" hide_on_mobile="small-visibility,medium-visibility,large-visibility" class="" id="" animation_type="" animation_direction="left" animation_speed="0.3" animation_offset=""]
Pour ouvrir et éditer le fichier de configuration de GitLab Runner, connecter vous en ssh à votre bastion et utiliser un éditeur de texte tel que nano ou vim.
[/fusion_text][fusion_syntax_highlighter theme="" language="x-sh" line_numbers="" line_wrapping="" copy_to_clipboard="" copy_to_clipboard_text="" hide_on_mobile="small-visibility,medium-visibility,large-visibility" class="" id="" font_size="" border_size="" border_color="" border_style="" background_color="" line_number_background_color="" line_number_text_color="" margin_top="" margin_right="" margin_bottom="" margin_left=""]dmltwqAvZXRjL2dpdGxhYi1ydW5uZXIvY29uZmlnLnRvbWw=[/fusion_syntax_highlighter][fusion_syntax_highlighter theme="" language="yaml" line_numbers="" line_wrapping="" copy_to_clipboard="" copy_to_clipboard_text="" hide_on_mobile="small-visibility,medium-visibility,large-visibility" class="" id="" font_size="" border_size="" border_color="" border_style="" background_color="" line_number_background_color="" line_number_text_color="" margin_top="" margin_right="" margin_bottom="" margin_left=""]Y29uY3VycmVudMKgPcKgNTAgICPCoEFsbMKgcmVnaXN0ZXJlZMKgUnVubmVyc8KgY2FuwqBydW7CoHVwwqB0b8KgNTDCoGNvbmN1cnJlbnTCoGJ1aWxkcwpjaGVja19pbnRlcnZhbMKgPcKgMAoKCltzZXNzaW9uX3NlcnZlcl0KwqDCoHNlc3Npb25fdGltZW91dMKgPcKgMTgwMAoKCltbcnVubmVyc11dCsKgwqBuYW1lwqA9wqAiYmFzdGlvbiIKwqDCoHVybMKgPcKgIllPVVJHSVRMQUJVUkwiCsKgwqB0b2tlbsKgPcKgIlRPS0VOIsKgICPCoE5vdGXCoHRoaXPCoGlzwqBkaWZmZXJlbnTCoGZyb23CoHRoZcKgcmVnaXN0cmF0aW9uwqB0b2tlbsKgdXNlZMKgYnnCoGBnaXRsYWItcnVubmVywqByZWdpc3RlcmAKwqDCoGV4ZWN1dG9ywqA9wqAiZG9ja2VyK21hY2hpbmUiwqDCoCPCoFRoaXPCoFJ1bm5lcsKgaXPCoHVzaW5nwqB0aGXCoCdkb2NrZXIrbWFjaGluZSfCoGV4ZWN1dG9yCsKgwqBsaW1pdMKgPcKgMTDCoMKgI8KgVGhpc8KgUnVubmVywqBjYW7CoGV4ZWN1dGXCoHVwwqB0b8KgMTDCoGJ1aWxkc8KgKGNyZWF0ZWTCoG1hY2hpbmVzKQrCoMKgW3J1bm5lcnMuZG9ja2VyXQrCoMKgwqDCoGltYWdlwqA9wqAiYWxwaW5lOmxhdGVzdCLCoMKgI8KgT3VywqBzZWN1cmXCoGltYWdlCsKgwqBbcnVubmVycy5tYWNoaW5lXQrCoMKgwqDCoElkbGVDb3VudMKgPcKgMcKgwqAjwqBUaGXCoGFtb3VudMKgb2bCoGlkbGXCoG1hY2hpbmVzwqB3ZcKgcmVxdWlyZcKgZm9ywqBDScKgaWbCoGJ1aWxkwqBxdWV1ZcKgaXPCoGVtcHR5CsKgwqDCoMKgSWRsZVRpbWXCoD3CoDYwMMKgwqAjwqBFYWNowqBtYWNoaW5lwqBjYW7CoGJlwqBpZGxlwqBmb3LCoHVwwqB0b8KgNjAwwqBzZWNvbmRzLMKgdGhlbsKgZGVzdHJveWVkCsKgwqDCoMKgTWFjaGluZU5hbWXCoD3CoCJhdXRvLXNjYWxlLSVzIsKgwqAjwqBFYWNowqBtYWNoaW5lwqB3aWxswqBoYXZlwqBhwqB1bmlxdWXCoG5hbWXCoCgnJXMnwqBpc8KgcmVxdWlyZWTCoGFuZMKgZ2VuZXJhdGVzwqBhwqByYW5kb23CoG51bWJlcikKwqDCoMKgwqBNYWNoaW5lRHJpdmVywqA9wqAiZGlnaXRhbG9jZWFuIsKgwqAjwqBEb2NrZXLCoE1hY2hpbmXCoGlzwqB1c2luZ8KgdGhlwqAnZGlnaXRhbG9jZWFuJ8KgZHJpdmVyCsKgwqDCoMKgTWFjaGluZU9wdGlvbnPCoD3CoFsKwqDCoMKgwqDCoMKgwqDCoCJkaWdpdGFsb2NlYW4taW1hZ2U9Y29yZW9zLXN0YWJsZSIswqAgI8KgVGhlwqBEaWdpdGFsT2NlYW7CoHN5c3RlbcKgaW1hZ2XCoHRvwqB1c2XCoGJ5wqBkZWZhdWx0CsKgwqDCoMKgwqDCoMKgwqAiZGlnaXRhbG9jZWFuLXNzaC11c2VyPWNvcmUiLCAgI8KgVGhlwqBkZWZhdWx0wqBTU0jCoHVzZXIKwqDCoMKgwqDCoMKgwqDCoCJkaWdpdGFsb2NlYW4tYWNjZXNzLXRva2VuPUFDQ0VTU19UT0tFTiIswqAgI8KgQWNjZXNzwqB0b2tlbsKgZnJvbcKgU3RlcMKgNwrCoMKgwqDCoMKgwqDCoMKgImRpZ2l0YWxvY2Vhbi1yZWdpb249ZnJhMSIswqDCoCPCoFRoZcKgZGF0YcKgY2VudGVywqB0b8Kgc3Bhd27CoHJ1bm5lcnPCoGluCsKgwqDCoMKgwqDCoMKgwqAiZGlnaXRhbG9jZWFuLXNpemU9MWdiIizCoMKgI8KgVGhlwqBzaXplwqAoYW5kwqBwcmljZcKgY2F0ZWdvcnkpwqBvZsKgeW91csKgc3Bhd25lZMKgcnVubmVycwrCoMKgwqDCoMKgwqDCoMKgImRpZ2l0YWxvY2Vhbi1wcml2YXRlLW5ldHdvcmtpbmciwqAgI8KgRW5hYmxlwqBwcml2YXRlwqBuZXR3b3JraW5nwqBvbsKgcnVubmVycwrCoMKgwqDCoF0KwqDCoFtydW5uZXJzLmNhY2hlXQrCoMKgwqDCoFR5cGXCoD3CoCJzMyIKwqDCoMKgwqBbcnVubmVycy5jYWNoZS5zM13CoMKgI8KgVGhlwqBSdW5uZXLCoGlzwqB1c2luZ8KgYcKgZGlzdHJpYnV0ZWTCoGNhY2hlwqB3aXRowqB0aGXCoFMzLWNvbXBhdGlibGXCoFNwYWNlc8Kgc2VydmljZQrCoMKgwqDCoMKgwqBTZXJ2ZXJBZGRyZXNzwqA9wqAiZ2l0bGFiLWNhY2hpbmcuZnJhMS5kaWdpdGFsb2NlYW5zcGFjZXMuY29tIgrCoMKgwqDCoMKgwqBBY2Nlc3NLZXnCoD3CoCJBQ0NFU1NfS0VZIgrCoMKgwqDCoMKgwqBTZWNyZXRLZXnCoD3CoCJTRUNSRVRfS0VZIgrCoMKgwqDCoMKgwqBCdWNrZXROYW1lwqA9wqAiZ2l0bGFiLWNhY2hpbmciCsKgwqDCoMKgwqDCoEluc2VjdXJlwqA9wqB0cnVlwqDCoCPCoFdlwqBkb8Kgbm90wqBoYXZlwqBhwqBTU0zCoGNlcnRpZmljYXRlLMKgYXPCoHdlwqBhcmXCoG9ubHnCoHJ1bm5pbmfCoGxvY2FsbHk=[/fusion_syntax_highlighter][fusion_text columns="" column_min_width="" column_spacing="" rule_style="default" rule_size="" rule_color="" hide_on_mobile="small-visibility,medium-visibility,large-visibility" class="" id="" animation_type="" animation_direction="left" animation_speed="0.3" animation_offset=""]
Une fois terminé, redémarrez votre Runner pour vous assurer que la configuration soit utilisée :
[/fusion_text][fusion_syntax_highlighter theme="" language="x-sh" line_numbers="" line_wrapping="" copy_to_clipboard="" copy_to_clipboard_text="" hide_on_mobile="small-visibility,medium-visibility,large-visibility" class="" id="" font_size="" border_size="" border_color="" border_style="" background_color="" line_number_background_color="" line_number_text_color="" margin_top="" margin_right="" margin_bottom="" margin_left=""]Z2l0bGFiLXJ1bm5lcsKgcmVzdGFydA==[/fusion_syntax_highlighter][fusion_title title_type="text" rotation_effect="bounceIn" display_time="1200" highlight_effect="circle" loop_animation="off" highlight_width="9" highlight_top_margin="0" before_text="" rotation_text="" highlight_text="" after_text="" hide_on_mobile="small-visibility,medium-visibility,large-visibility" class="" id="" content_align="left" size="1" font_size="" animated_font_size="" fusion_font_family_title_font="" fusion_font_subset_title_font="" fusion_font_variant_title_font="" line_height="" letter_spacing="" margin_top="" margin_bottom="" margin_top_mobile="" margin_bottom_mobile="" text_color="" animated_text_color="" highlight_color="" style_type="default" sep_color="" animation_type="" animation_direction="left" animation_speed="0.3" animation_offset=""]
Étape 8 : Place aux tests
[/fusion_title][fusion_text columns="" column_min_width="" column_spacing="" rule_style="default" rule_size="" rule_color="" hide_on_mobile="small-visibility,medium-visibility,large-visibility" class="" id="" animation_type="" animation_direction="left" animation_speed="0.3" animation_offset=""]
Vous venez de finir la configuration de votre bastion gitlab. Vous allez pouvoir vérifier en exécutant l’intégration continue d’un de vos projets. Après le temps d'inactivité spécifié, les machines devraient être automatiquement détruites, mais nous vous recommandons de le vérifier manuellement pour vous assurer que vous n'êtes pas facturé de manière inattendue.
Dans certains cas, le GitLab peut signaler que le runner est injoignable et, par conséquent, n'effectuer aucune action, y compris le déploiement de nouveaux runner. Vous pouvez résoudre ce problème en arrêtant le GitLab Runner, puis en le redémarrant en mode débogage :
[/fusion_text][fusion_syntax_highlighter theme="" language="x-sh" line_numbers="" line_wrapping="" copy_to_clipboard="" copy_to_clipboard_text="" hide_on_mobile="small-visibility,medium-visibility,large-visibility" class="" id="" font_size="" border_size="" border_color="" border_style="" background_color="" line_number_background_color="" line_number_text_color="" margin_top="" margin_right="" margin_bottom="" margin_left=""]Z2l0bGFiLXJ1bm5lcsKgc3RvcApnaXRsYWItcnVubmVywqAtLWRlYnVnwqBzdGFydA==[/fusion_syntax_highlighter][fusion_text columns="" column_min_width="" column_spacing="" rule_style="default" rule_size="" rule_color="" hide_on_mobile="small-visibility,medium-visibility,large-visibility" class="" id="" animation_type="" animation_direction="left" animation_speed="0.3" animation_offset=""]
Une erreur devrait s’afficher, vous permettant de déterminer quelle configuration est à l'origine du problème.
Si votre configuration crée trop de machines, et que vous souhaitez toutes les supprimer en même temps, vous pouvez exécuter cette commande pour les détruire toutes :
[/fusion_text][fusion_syntax_highlighter theme="" language="x-sh" line_numbers="" line_wrapping="" copy_to_clipboard="" copy_to_clipboard_text="" hide_on_mobile="small-visibility,medium-visibility,large-visibility" class="" id="" font_size="" border_size="" border_color="" border_style="" background_color="" line_number_background_color="" line_number_text_color="" margin_top="" margin_right="" margin_bottom="" margin_left=""]ZG9ja2VyLW1hY2hpbmXCoHJtwqAkKGRvY2tlci1tYWNoaW5lwqBsc8KgLXEp[/fusion_syntax_highlighter][fusion_text columns="" column_min_width="" column_spacing="" rule_style="default" rule_size="" rule_color="" hide_on_mobile="small-visibility,medium-visibility,large-visibility" class="" id="" animation_type="" animation_direction="left" animation_speed="0.3" animation_offset=""]
Pour plus de dépannage et des options de configuration supplémentaires, vous pouvez vous référer à la documentation officielle GitLab.
[/fusion_text][/fusion_builder_column][/fusion_builder_row][/fusion_builder_container]